
I am presently using eclipse v3.5 on Mac OS X 10.6.2 and have yet to find a way to change the java coffee cup logo in the document icon for my jar files created in eclipse. Is there some way I can call a specific Apple class in Eclipse to change the dock/application icon of my.jar file? Copy files from one folder to another. Option dragging and dropping files to copy them from one place to another is so passe. Try Terminal's Ditto command instead. Type: Ditto original folder new folder Where 'original folder' and 'new folder' are the file paths of the source and destination of the files.
Take a minute to look at the row of icons at the bottom of your display. That row is the Dock, and those individual pictures are known as icons.
Dock icons are a quick way to bring a hidden window or application to the front so that you can work with it again. Dock icons are odd ducks — they’re activated with a single-click. Most icons are selected (highlighted) when you single click and opened when you double-click. So Dock icons are kind of like links on a Web page — you need only a single click to open them.
You can customize your Dock with favorite applications, a document you update daily, or maybe a folder containing your favorite recipes — use the Dock for anything you need quick access to. Here’s how you can add an icon to the Dock or remove a Dock icon you no longer desire.
Adding an icon to the Dock
Adding an application, file, or folder to the Dock is as easy as 1-2-3. First, open a Finder window that contains an application, file, folder, URL, or disk icon that you use frequently. Then follow these steps to add it to the Dock:
1. Click the item you want to add to the Dock.
2. Drag the icon out of the Finder window and onto the Dock, as shown in Figure 1.
3. An icon for this item now appears on the Dock.
Folder, disk, and URL icons must be on the right of the divider line in the Dock; Application icons must be on the left of it.
Figure 1: Drag an icon onto the Dock to add it.
You can add several items at the same time to the Dock by selecting them all and dragging the group to the Dock. However, you can delete only one icon at a time from the Dock.
Removing an icon from the Dock
To remove an item from the Dock, just drag its icon onto the Desktop. It disappears with a cool poof animation, as shown in Figure 2.
Figure 2: To remove an icon, drag it off the Dock and POOF — it’s gone.
By moving an icon out of the Dock, you aren’t moving, deleting, or copying the item itself — you’re just removing its icon from the Dock. The item is unchanged. Think of it like a library catalog card: Just because you remove the card from the card catalog doesn’t mean that the book is gone from the library.
After you figure out which programs you use and don’t use, it’s a good idea to relieve overcrowding by removing the ones you never (or rarely) use.
Knowing what to put in your Dock
Put things on the Dock that you need quick access to and that you use often, or add items that aren’t quickly available from menus or the sidebar. If you like using the Dock better than the Finder window sidebar, for example, add your Documents, Movies, Pictures, Music, or even your hard disk to the Dock.
Consider adding these items to your Dock:
- A word-processing application: Most people use word-processing software more than any other application.
- A project folder: You know, the folder that contains all the documents for your thesis, or the biggest project you have at work, or your massive recipe collection . . . whatever. Add that folder to the Dock, and then you can access it much quicker than if you have to open several folders to find it.
- Don’t forget — if you
press
- (click but don’t let go) on a folder icon, a handy hierarchical menu of its contents appears.
- A special utility or application: You may want to add your favorite graphics application such as Photoshop, or the game you play every afternoon when you think the boss isn’t watching.
- Your favorite URLs: Save links to sites that you visit every day — ones that you use in your job, your favorite Mac news sites, or your personalized page from an Internet service provider (ISP). Sure, you can make one of these pages your browser’s start page or bookmark it, but the Dock lets you add one or more additional URLs.
- Here’s how to quickly add a URL to the Dock. Open Safari and go to the page with a URL that you want to save on the Dock. Click and drag the small icon that you find at the left of the URL in the Address bar to the right side of the dividing line in the Dock (at the arrow’s head in Figure 3) and then release the mouse button. The icons in the Dock will slide over and make room for your URL. From now on, when you click the URL icon that you moved to your Dock, Safari opens to that page.
Figure 3: To save a URL to your Dock, drag its little icon from the Address bar to the right side of the Dock.
- You can add several URL icons to the Dock, but bear in mind that the Dock and its icons shrink to accommodate added icons, thus making them harder to see. Perhaps the best idea — if you want easy access to several URLs — is to create a folder full of URLs and put that folder on the Dock. Then you can just press and hold your mouse pointer on the folder (or Control-click the folder) to pop up a menu with all your URLs.
Even though you can make the Dock smaller, you’re still limited to one row of icons. The smaller you make the Dock, the larger the crowd of icons you can amass. You have to determine for yourself what’s best for you: having lots of icons available on the Dock (even though they may be difficult to see because they’re so tiny) or having less clutter but fewer icons on your Dock.
In CS106A, we'll be using Stanford's customized version of Eclipse to build our programs. Eclipse is an enormously popular industrial-strength Java environment with many features. Fortunately, Eclipse is also open source -- anyone is free to change Eclipse to work the way they want. We have taken advantage of that freedom to install special Stanford features into Eclipse, tailoring it specifically for CS106A. This document gives instructions on how to get started using Stanford Eclipse. Please pay close attention to these instructions and do not skip steps!

Contents
Mac Installation Windows Installation Configuring Eclipse for CS106A I need help!Installing Eclipse on a Mac
Stanford Eclipse will only work on Mac OS X version 10.6 or higher. If you don't have that version of the operating system, you'll need to either upgrade or do your class work in a public cluster.
- Download and install the Java SDK installer for Mac
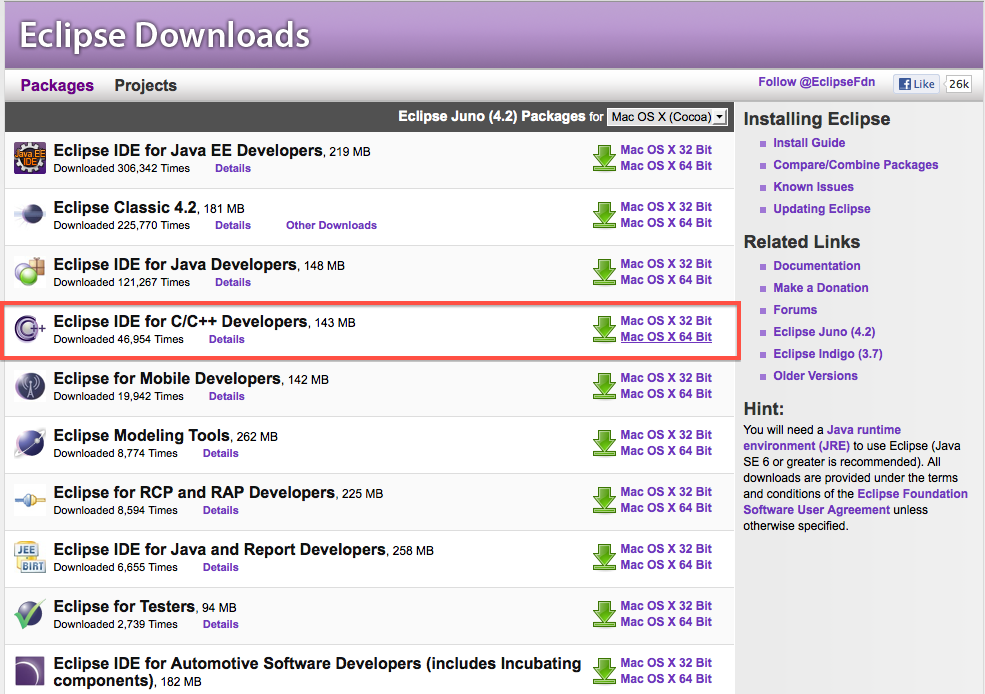
- Download the Mac version of Eclipse
- Double-click on the file eclipse-mac.dmg to open the Eclipse disk image(You can delete eclipse-mac.dmg afterwards).
- Drag the Eclipse app into the Applications folder on your Mac.
- Drag the Eclipse icon from your Applications folder to your Dock to create a shortcut.
- Click on the icon in the dock to open Eclipse. If you see an error that says Eclipse 'can't be opened because it is from an unidentified developer,' right-click on the Eclipse icon and select 'open' instead. You will be able to open Eclipse without right-clicking from now on.
- Skip to the instructions below to configure Eclipse for CS106A.
Installing Eclipse in Windows
Our version of Eclipse will run on Windows 7 (2009) or higher. In the very unlikely event you have an older version of Windows on your computer, you will need to either upgrade or do your class work in one of the public computer clusters. You can check your version of Windows using these instructions.
- Uninstall previous versions of the Java Runtime Environment (JRE). Before installing a new version of the JRE, we recommend that you remove any older copies that may be installed on your system.
- If you have Windows 7 or 8, do the following: Click on Start, then click on Control Panel, then select Programs and Features.
If you have Windows 10, do the following: Click on Start (the Windows icon in the lower left-hand corner), then click on Settings (the gear-shaped icon), then select Apps & Features.
- From the list of programs you see, uninstall any occurrences of Java/J2SE Runtime Environment, Java SDK, Java SE Development Kit or Java Update. Note that the exact program name may be slightly different or include a version number, but you generally want to remove anything that includes the text: Java/J2SE Runtime Environment, Java SDK, Java SE Development Kit or Java Update. To remove a program, click on the program name to highlight it and click the the Uninstall button.
- If you have Windows 7 or 8, do the following: Click on Start, then click on Control Panel, then select Programs and Features.
- Download Eclipse.
Save the downloaded file to somewhere on your hard drive. This may take a little while as the file is rather large. - Unzip/extract the contents of the file by right-clicking on the folder you just downloaded, selecting the Extract All.. option and typing C:Program Files as the location to extract the files to. Then continue following the steps in the extraction process.
- Create a shortcut to Eclipse on your Desktop for easy access — Open the C:Program Fileseclipse directory, and right-click and drag the eclipse.exe file (the Eclipse application) to your desktop and then select the option Create shortcut here.
- Continue to the instructions below to configure Eclipse for CS106A.
Note: If you installed the 64 bit versions of the software, and find that you have issues running Eclipse, we recommend that you uninstall Eclipse by deleting the C:Program Fileseclipse directory and install the 32 bit versions of both: the JRE 32 bit version for Windows and Eclipse 32 bit version for Windows, in that order.
Configuring Eclipse for CS106A (both Mac and Windows)
Once you have Eclipse installed on your computer, there are a few CS106A-specific changes you need to make so that you can access some special Stanford features, like submitting assignments. The following instructions apply to all operating systems, although the screenshots are from a Mac.
- Open Eclipse if you haven't already. When you run Eclipse for the first time, you may get a screen that looks like this:
A workspace is just a directory that Eclipse will use to place new projects in. In 106A you won't have to make any new projects from scratch. We will always give you skeleton projects for your assignments, so you don't need to worry about where the workspace is. The suggested location is fine. Click the Use this as the default and do not ask again checkbox, and then click OK. - Once Eclipse has started, you can close the 'Welcome' tab using the 'X' in the top left.
- Click Help -> Install New Software.
- In the 'Work with' text box, type https://web.stanford.edu/dept/cs_edu/eclipse/plugin and press Enter.
- Click 'Select All,' then click Next.
- Click Next again.
- Click 'I accept the terms of the license agreement,' then click Finish.
- Click OK when you see the warning about installing unsigned content.
- Click Yes when asked to restart Eclipse.
- After restarting, you should see a 'Stanford Menu' in the top bar, as well as several new icons in your top toolbar area.
- Go to Eclipse -> Preferences to open the Preferences window. In the dropdowns on the left, expand Run/Debug, and click Perspectives. Set 'Open the associated perspective when an application suspends' to Never, as shown below, and click Apply and Close.
- Now that you have Eclipse loaded and configured, your next step is to add a project to your workspace by importing a skeletal framework that we provide with each assignment called a starter project. Using starter projects makes your life much easier by allowing you to ignore the many details involved in creating a project from scratch. Every assignment will include a starter project for each problem, and your first task for each assignment will be to download the starter project from the class website and then import it into your workspace. The details for doing so are described in the handout 'Using Karel with Eclipse'.
Having trouble with your installation?
Check out this doc for common Eclipse errors and issues / Troubleshooting, email the Head TA or stop by their Office Hours, or stop by the LaIR. During the first week, you can also stop by the Eclipse Setup Session on Wednesday 4/4/18 7-9 PM in the LaIR (first floor of Tresidder).
Troubleshooting
- Q: Eclipse is showing an error in the Console 'Could not save C++ lib configuration file.' Do I need to worry about this?
A: No. This error should not affect the running of your programs, and you can ignore it. - Q: Help! I don't see the 'running person', submit, import, etc. icons or the 'Stanford Menu' in my Eclipse.
A: This means the Stanford Plugin is not installed; please repeat the steps under 'Installing the CS106A plugin' above. - Q: My Eclipse window doesn't look like the ones in the screenshots or in lecture. I'm missing some of the panels (e.g. the sidebar showing all my projects). Help!
A: Click the 'Reset' button in the Stanford Menu to reset to the default view. You may also be in Debugger mode instead of Editor mode; use the Stanford Menu to go back to Editor mode. - Q: Eclipse is not letting me import a project. It gives me a warning at the top of the import window that 'Some projects cannot be imported'.
A: This is because a project with that name is already imported into Eclipse. If you would like to import this project, you must first delete the existing project by right-clicking the project in the sidebar and selecting 'Delete'. You can then choose whether to delete the project from your computer as well, or just delete the project from Eclipse. - Q: When I run a Karel program, it immediately crashes with an 'Unsupported Version Error'.
A: This means Eclipse is using Java 9, which is not compatible with running your programs. See the solution to the following question about being unable to run programs. - Q: When I click the running person icon to run programs, Eclipse gives me an error that it 'could not find any programs to run', even though I have a project imported with programs.
A: This means Eclipse is using Java 9, which is not compatible with running your programs. To change Eclipse to use Java 8 instead, follow these steps:- Open Eclipse Preferences: On Mac: in the top toolbar, go to Eclipse -> Preferences. On Windows: in the top toolbar, go to Window -> Preferences.
- Change JRE version to 8: In the sidebar of the preferences window, expand the 'Java' section. Click on 'Installed JREs'. If the checked option is a version of Java SE 9, instead check the box next to Java SE 8 [1.8.0_152]. Click 'Apply' in the bottom right.
- Change Compiler version to 1.8: In the sidebar of the preferences window, click on 'Compiler'. If the 'Compiler compliance level' is 9, change it to 1.8. Click 'Apply' in the bottom right.
- Close the preferences window. You should be good to go!
- Author: admin
- Category: Category
Search
News
- Iwantit Wireless Bluetooth Keyboard For Mac
- Jual Installer Bootable Mac Os X High Sierra 1013 For Mac
- Keyboard Tracking Software For Mac
- Linksys Wusb54gs Ver 2 Drivers For Mac
- T-racks Mac Torrent
- Error Code 3253 Outlook For Mac
- Autocad 2011 Free Download Full Version With Crack For Mac
- Cucm Sql Query For Mac
- The Easysoft Odbc Sql Server Driver For Mac
- Zte Ac8700 Driver For Mac
I am presently using eclipse v3.5 on Mac OS X 10.6.2 and have yet to find a way to change the java coffee cup logo in the document icon for my jar files created in eclipse. Is there some way I can call a specific Apple class in Eclipse to change the dock/application icon of my.jar file? Copy files from one folder to another. Option dragging and dropping files to copy them from one place to another is so passe. Try Terminal's Ditto command instead. Type: Ditto original folder new folder Where 'original folder' and 'new folder' are the file paths of the source and destination of the files.
Take a minute to look at the row of icons at the bottom of your display. That row is the Dock, and those individual pictures are known as icons.
Dock icons are a quick way to bring a hidden window or application to the front so that you can work with it again. Dock icons are odd ducks — they’re activated with a single-click. Most icons are selected (highlighted) when you single click and opened when you double-click. So Dock icons are kind of like links on a Web page — you need only a single click to open them.
You can customize your Dock with favorite applications, a document you update daily, or maybe a folder containing your favorite recipes — use the Dock for anything you need quick access to. Here’s how you can add an icon to the Dock or remove a Dock icon you no longer desire.
Adding an icon to the Dock
Adding an application, file, or folder to the Dock is as easy as 1-2-3. First, open a Finder window that contains an application, file, folder, URL, or disk icon that you use frequently. Then follow these steps to add it to the Dock:
1. Click the item you want to add to the Dock.
2. Drag the icon out of the Finder window and onto the Dock, as shown in Figure 1.
3. An icon for this item now appears on the Dock.
Folder, disk, and URL icons must be on the right of the divider line in the Dock; Application icons must be on the left of it.
Figure 1: Drag an icon onto the Dock to add it.
You can add several items at the same time to the Dock by selecting them all and dragging the group to the Dock. However, you can delete only one icon at a time from the Dock.
Removing an icon from the Dock
To remove an item from the Dock, just drag its icon onto the Desktop. It disappears with a cool poof animation, as shown in Figure 2.
Figure 2: To remove an icon, drag it off the Dock and POOF — it’s gone.
By moving an icon out of the Dock, you aren’t moving, deleting, or copying the item itself — you’re just removing its icon from the Dock. The item is unchanged. Think of it like a library catalog card: Just because you remove the card from the card catalog doesn’t mean that the book is gone from the library.
After you figure out which programs you use and don’t use, it’s a good idea to relieve overcrowding by removing the ones you never (or rarely) use.
Knowing what to put in your Dock
Put things on the Dock that you need quick access to and that you use often, or add items that aren’t quickly available from menus or the sidebar. If you like using the Dock better than the Finder window sidebar, for example, add your Documents, Movies, Pictures, Music, or even your hard disk to the Dock.
Consider adding these items to your Dock:
- A word-processing application: Most people use word-processing software more than any other application.
- A project folder: You know, the folder that contains all the documents for your thesis, or the biggest project you have at work, or your massive recipe collection . . . whatever. Add that folder to the Dock, and then you can access it much quicker than if you have to open several folders to find it.
- Don’t forget — if you
press
- (click but don’t let go) on a folder icon, a handy hierarchical menu of its contents appears.
- A special utility or application: You may want to add your favorite graphics application such as Photoshop, or the game you play every afternoon when you think the boss isn’t watching.
- Your favorite URLs: Save links to sites that you visit every day — ones that you use in your job, your favorite Mac news sites, or your personalized page from an Internet service provider (ISP). Sure, you can make one of these pages your browser’s start page or bookmark it, but the Dock lets you add one or more additional URLs.
- Here’s how to quickly add a URL to the Dock. Open Safari and go to the page with a URL that you want to save on the Dock. Click and drag the small icon that you find at the left of the URL in the Address bar to the right side of the dividing line in the Dock (at the arrow’s head in Figure 3) and then release the mouse button. The icons in the Dock will slide over and make room for your URL. From now on, when you click the URL icon that you moved to your Dock, Safari opens to that page.
Figure 3: To save a URL to your Dock, drag its little icon from the Address bar to the right side of the Dock.
- You can add several URL icons to the Dock, but bear in mind that the Dock and its icons shrink to accommodate added icons, thus making them harder to see. Perhaps the best idea — if you want easy access to several URLs — is to create a folder full of URLs and put that folder on the Dock. Then you can just press and hold your mouse pointer on the folder (or Control-click the folder) to pop up a menu with all your URLs.
Even though you can make the Dock smaller, you’re still limited to one row of icons. The smaller you make the Dock, the larger the crowd of icons you can amass. You have to determine for yourself what’s best for you: having lots of icons available on the Dock (even though they may be difficult to see because they’re so tiny) or having less clutter but fewer icons on your Dock.
In CS106A, we'll be using Stanford's customized version of Eclipse to build our programs. Eclipse is an enormously popular industrial-strength Java environment with many features. Fortunately, Eclipse is also open source -- anyone is free to change Eclipse to work the way they want. We have taken advantage of that freedom to install special Stanford features into Eclipse, tailoring it specifically for CS106A. This document gives instructions on how to get started using Stanford Eclipse. Please pay close attention to these instructions and do not skip steps!
Contents
Mac Installation Windows Installation Configuring Eclipse for CS106A I need help!Installing Eclipse on a Mac
Stanford Eclipse will only work on Mac OS X version 10.6 or higher. If you don't have that version of the operating system, you'll need to either upgrade or do your class work in a public cluster.
- Download and install the Java SDK installer for Mac
- Download the Mac version of Eclipse
- Double-click on the file eclipse-mac.dmg to open the Eclipse disk image(You can delete eclipse-mac.dmg afterwards).
- Drag the Eclipse app into the Applications folder on your Mac.
- Drag the Eclipse icon from your Applications folder to your Dock to create a shortcut.
- Click on the icon in the dock to open Eclipse. If you see an error that says Eclipse 'can't be opened because it is from an unidentified developer,' right-click on the Eclipse icon and select 'open' instead. You will be able to open Eclipse without right-clicking from now on.
- Skip to the instructions below to configure Eclipse for CS106A.
Installing Eclipse in Windows
Our version of Eclipse will run on Windows 7 (2009) or higher. In the very unlikely event you have an older version of Windows on your computer, you will need to either upgrade or do your class work in one of the public computer clusters. You can check your version of Windows using these instructions.
- Uninstall previous versions of the Java Runtime Environment (JRE). Before installing a new version of the JRE, we recommend that you remove any older copies that may be installed on your system.
- If you have Windows 7 or 8, do the following: Click on Start, then click on Control Panel, then select Programs and Features.
If you have Windows 10, do the following: Click on Start (the Windows icon in the lower left-hand corner), then click on Settings (the gear-shaped icon), then select Apps & Features.
- From the list of programs you see, uninstall any occurrences of Java/J2SE Runtime Environment, Java SDK, Java SE Development Kit or Java Update. Note that the exact program name may be slightly different or include a version number, but you generally want to remove anything that includes the text: Java/J2SE Runtime Environment, Java SDK, Java SE Development Kit or Java Update. To remove a program, click on the program name to highlight it and click the the Uninstall button.
- If you have Windows 7 or 8, do the following: Click on Start, then click on Control Panel, then select Programs and Features.
- Download Eclipse.
Save the downloaded file to somewhere on your hard drive. This may take a little while as the file is rather large. - Unzip/extract the contents of the file by right-clicking on the folder you just downloaded, selecting the Extract All.. option and typing C:Program Files as the location to extract the files to. Then continue following the steps in the extraction process.
- Create a shortcut to Eclipse on your Desktop for easy access — Open the C:Program Fileseclipse directory, and right-click and drag the eclipse.exe file (the Eclipse application) to your desktop and then select the option Create shortcut here.
- Continue to the instructions below to configure Eclipse for CS106A.
Note: If you installed the 64 bit versions of the software, and find that you have issues running Eclipse, we recommend that you uninstall Eclipse by deleting the C:Program Fileseclipse directory and install the 32 bit versions of both: the JRE 32 bit version for Windows and Eclipse 32 bit version for Windows, in that order.
Configuring Eclipse for CS106A (both Mac and Windows)
Once you have Eclipse installed on your computer, there are a few CS106A-specific changes you need to make so that you can access some special Stanford features, like submitting assignments. The following instructions apply to all operating systems, although the screenshots are from a Mac.
- Open Eclipse if you haven't already. When you run Eclipse for the first time, you may get a screen that looks like this:
A workspace is just a directory that Eclipse will use to place new projects in. In 106A you won't have to make any new projects from scratch. We will always give you skeleton projects for your assignments, so you don't need to worry about where the workspace is. The suggested location is fine. Click the Use this as the default and do not ask again checkbox, and then click OK. - Once Eclipse has started, you can close the 'Welcome' tab using the 'X' in the top left.
- Click Help -> Install New Software.
- In the 'Work with' text box, type https://web.stanford.edu/dept/cs_edu/eclipse/plugin and press Enter.
- Click 'Select All,' then click Next.
- Click Next again.
- Click 'I accept the terms of the license agreement,' then click Finish.
- Click OK when you see the warning about installing unsigned content.
- Click Yes when asked to restart Eclipse.
- After restarting, you should see a 'Stanford Menu' in the top bar, as well as several new icons in your top toolbar area.
- Go to Eclipse -> Preferences to open the Preferences window. In the dropdowns on the left, expand Run/Debug, and click Perspectives. Set 'Open the associated perspective when an application suspends' to Never, as shown below, and click Apply and Close.
- Now that you have Eclipse loaded and configured, your next step is to add a project to your workspace by importing a skeletal framework that we provide with each assignment called a starter project. Using starter projects makes your life much easier by allowing you to ignore the many details involved in creating a project from scratch. Every assignment will include a starter project for each problem, and your first task for each assignment will be to download the starter project from the class website and then import it into your workspace. The details for doing so are described in the handout 'Using Karel with Eclipse'.
Having trouble with your installation?
Check out this doc for common Eclipse errors and issues / Troubleshooting, email the Head TA or stop by their Office Hours, or stop by the LaIR. During the first week, you can also stop by the Eclipse Setup Session on Wednesday 4/4/18 7-9 PM in the LaIR (first floor of Tresidder).
Troubleshooting
- Q: Eclipse is showing an error in the Console 'Could not save C++ lib configuration file.' Do I need to worry about this?
A: No. This error should not affect the running of your programs, and you can ignore it. - Q: Help! I don't see the 'running person', submit, import, etc. icons or the 'Stanford Menu' in my Eclipse.
A: This means the Stanford Plugin is not installed; please repeat the steps under 'Installing the CS106A plugin' above. - Q: My Eclipse window doesn't look like the ones in the screenshots or in lecture. I'm missing some of the panels (e.g. the sidebar showing all my projects). Help!
A: Click the 'Reset' button in the Stanford Menu to reset to the default view. You may also be in Debugger mode instead of Editor mode; use the Stanford Menu to go back to Editor mode. - Q: Eclipse is not letting me import a project. It gives me a warning at the top of the import window that 'Some projects cannot be imported'.
A: This is because a project with that name is already imported into Eclipse. If you would like to import this project, you must first delete the existing project by right-clicking the project in the sidebar and selecting 'Delete'. You can then choose whether to delete the project from your computer as well, or just delete the project from Eclipse. - Q: When I run a Karel program, it immediately crashes with an 'Unsupported Version Error'.
A: This means Eclipse is using Java 9, which is not compatible with running your programs. See the solution to the following question about being unable to run programs. - Q: When I click the running person icon to run programs, Eclipse gives me an error that it 'could not find any programs to run', even though I have a project imported with programs.
A: This means Eclipse is using Java 9, which is not compatible with running your programs. To change Eclipse to use Java 8 instead, follow these steps:- Open Eclipse Preferences: On Mac: in the top toolbar, go to Eclipse -> Preferences. On Windows: in the top toolbar, go to Window -> Preferences.
- Change JRE version to 8: In the sidebar of the preferences window, expand the 'Java' section. Click on 'Installed JREs'. If the checked option is a version of Java SE 9, instead check the box next to Java SE 8 [1.8.0_152]. Click 'Apply' in the bottom right.
- Change Compiler version to 1.8: In the sidebar of the preferences window, click on 'Compiler'. If the 'Compiler compliance level' is 9, change it to 1.8. Click 'Apply' in the bottom right.
- Close the preferences window. You should be good to go!
Search
News
- Iwantit Wireless Bluetooth Keyboard For Mac
- Jual Installer Bootable Mac Os X High Sierra 1013 For Mac
- Keyboard Tracking Software For Mac
- Linksys Wusb54gs Ver 2 Drivers For Mac
- T-racks Mac Torrent
- Error Code 3253 Outlook For Mac
- Autocad 2011 Free Download Full Version With Crack For Mac
- Cucm Sql Query For Mac
- The Easysoft Odbc Sql Server Driver For Mac
- Zte Ac8700 Driver For Mac